Design

Is it done yet?

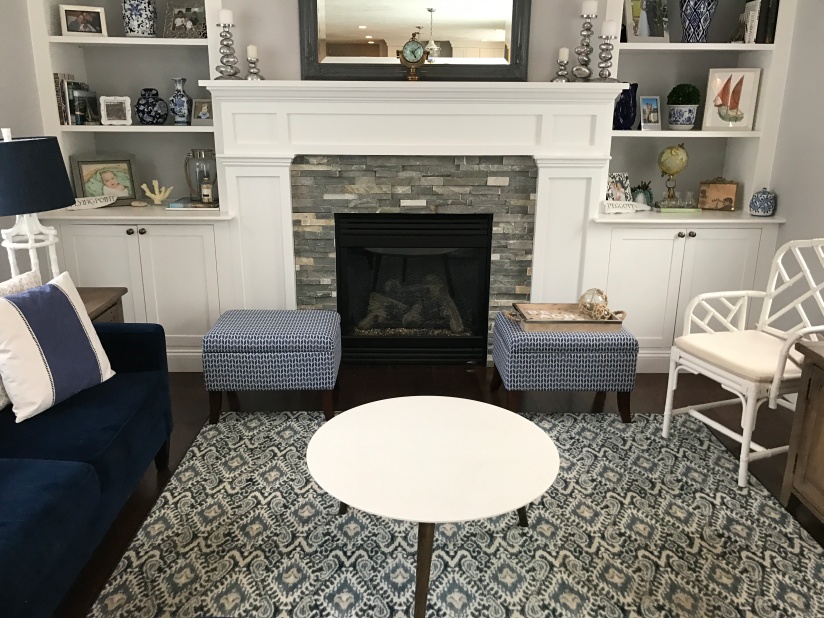
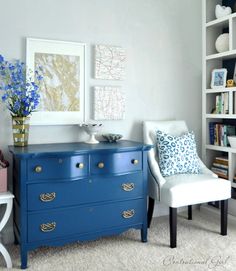
Pretty sure my husband said “is it done yet” 10x in the past few years as I added, tweaked and worked to make our living room complete! What I learned during the process…live in your house before you make it your home.  Don’t rush it.  Buy pieces (furniture and accessories) that will make it feel like a home.

The mistake I made with our living room was rushing to buy a couch before the living room was finished during the build process.  It’s not that the couch doesn’t work or that I don’t like the color/ fabric but we didn’t have a chance to “live” in the space to figure out the best way to lay out the room.  So, I have worked around the couch and made it all work together to be part of our home.  I am sitting on that very couch tonight writing this post.  Looking around the room tonight it makes me happy (design happy).  It’s a room we spend most of our time in as a family so I made sure it is comfortable but also brought in the various elements of color and design that I love.

As I work through my posts I will share my rooms that are complete and some that are still a work-in-progress (yes, even 3-years after moving in).  People say that there is always something to do with a house once you are a home owner.  Is it bad that I love the never-ending projects?  I do.  Home projects make me happy and keep me up a night brainstorming new ideas.

I can’t wait to share all of my ideas and projects with you on btb Style and Design and I hope to inspire all of the little or big projects you are taking on.

Living Room Details

IMG_1688

IMG_1739
This bamboo chair for Ballard is the best
IMG_1735
Great table from Rue La La- lightweight and easy to move around
IMG_1734
Ceiling fan = must for all living rooms
IMG_1728
These lamps are EVERYTHING!
IMG_1725
I probably re-style these shelves 1x a month
IMG_1704
I will always show you what it looks like in “real life” – so lots of pictures of my family!
IMG_1702
Close-up…trays make everything look better
IMG_1711
The couch – love the deep navy color
IMG_1699
Representing my home town- Long Island and my new home- South Shore!
IMG_1695
One of my favorite items in our Living Room- a tide clock (we use it every beach day in the summer!)
Building, Design

From plaster to paint- plus my 3 tips for selecting a paint color

Before I get into my next post I wanted to take a minute to say thank you to all of you who asked about the blog and missed my posts! The feedback was encouraging and has motivated me to open up my laptop and dive into Building the Bennett’s again. I don’t know what the future has in store for Building the Bennett’s but I know that it is something I enjoy doing. So thank you again for your support!

The next few posts are going to show how our house being completed over a period of about 4-weeks. We learned a lot during this process but it was really amazing to see what can get done in the last 4-6 weeks of your build. You have to know there are going to be delays, hiccups to the process and sometimes sacrifices but at the end you have a wonderful home.

When the interior paint was completed I had a few days of panic. Your house goes from all white to color in a matter of 2-days and if you use any bold colors (as we did) it can feel overwhelming. We were close to even re-painting two of the rooms as we doubted our selection. But we waited, and our “vision” came to life once the rooms were complete and furniture was delivered.

I learned a lot from this process and would have done a few things the same and a few things differently. Based on my learnings I think everyone should have these three tips when selecting a paint color:

1) Test the paint color(s)! Go to your local paint store and buy test paint. There are less brands that actually sell the small test jars so you have to invest a little more $ to buy the small paint jar but it is worth it. Next, test the paint on a piece of white board and bring it to your house and the room you are painting. Hold it up to the wall in different lights so you can get a sense of what it will really look like. And make sure you have enough of the paint (use two coats when testing) on the cardboard to really see the color.

2) Narrow down your color choices buy using a color fan deck and looking at it against fabrics or furniture you have in the room. One of the first things I purchased during the building process was the color wheel from Benjamin Moore Paints– you can get it at your paint store, hardware store or online. I brought the fan deck everywhere! Having the paint swatches allowed me to narrow down thousands of colors to around 20 to make our final choices.

3) Remember that your paint will always be brighter than a paint swatch- always! This might seem like a simple tip but one you should not forget!

With our painting experience both our Master Bedroom and Bath paint selections had us second guessing our choices when we first saw them. I was ready to change the bathroom, but felt like we would live with the bedroom. We decided to keep both as is and now we love both colors. Looking back, I would have paid more attention to tip #3 and happy that we followed tip #1 and #2. Good news is for anyone painting you can always change it- but why not make sure you love your first choice!

From Plaster to Paint-

Front Hall- Benjamin Moore Metro Grey

Front Hall- Benjamin Moore Metro Grey
Great Room- Benjamin Moore Metro Grey

Dining Room- Benjamin Moore Nob Hill Sage

Den- Benjamin Moore Smokey Taupe

Nursery- Benjamin Moore Palatial Skies

Master Bedroom- Benjamin Moore Lazy Sunday

Master Bedroom- Benjamin Moore Lazy Sunday
Master Bath- Benjamin Moore Morning Glory

Master Bath- Benjamin Moore Morning Glory

Building, Design

I am back…

I can’t even look to see the date of my last post as this delay is longer than I would like to admit. I am not even sure where to start with my posts but I will start with a few big updates…

1) The good news is- the house is complete and we moved in at the end of April!
2) Life! My lack of posting was due to a combination of- building the house, work, decorating the house – oh and being 8-9 months pregnant! On top of that our wonderful little girl decided to come a few weeks early – she was just so excited to see the new house and surprised on Mother’s Day with her arrival.
3) We LOVE our Home. We couldn’t be happier. Of course our house to do list is never-ending but I Love it. I definitely have a little OCD in getting the house decorated but I am also making sure that we live in it to make sure everything we buy and invest in makes sense for our home.

So, now that I am settled (sort of) I hope to spend the next few days catching you all up on what happened since the last post and then dive into my decorating obsessions which I have been spending way to much time on (but it is so fun).

To start, I would like to share one of my favorite pictures of our HOME- it seems simple but a the door to your home is a key focal point. You want people to feel welcome when they come to your door. I tried to accomplish that by painting the door a shade of my favorite color (blue). This Benjamin Moore Color is called New York State of Mind- once I knew the name I was sold. I love New York, and always will, so this is a little connection point for where I grew up. Plus, the color looks great with the siding.

Looking forward to sharing more with you over the next few days-
xo Kris

IMG_3350

Building, Design

Plaster complete- trim in progress!

Sometimes waiting an extra few days to check out the house is worth it. We went by today and the progress was huge- plaster complete, interior doors are in, trim in progress and wainscoting almost complete! Here is a quick look – more to come later this week.

20140304-212722.jpg

20140304-212742.jpg

Building, Design, Shopping

Make the best of what you have! Key tips to getting your house furnished.

If you are moving into a new space (whether it be a house or apartment) it can be overwhelming to think about furnishing the new space. I have learned a few key things in getting ready to decorate our new house and wanted to share them with you.

Key tips to getting your house furnished

1) Salvage something old and make it new with a little work and paint. Look at what you own now (or perhaps something stored in your parents attic!) and think about what you would want it to be. Whether you want to take on a project yourself or find someone local to refurbish a piece of furniture it could change the look and feel of something you already own. If you end up finding someone to do it shop around and get a few bids- its important to find someone who gets your style/ taste and you have confidence in the finished product. If you take it on yourself, do your research before diving in. Between Pinterest, Houzz and Design Magazines there are plenty of guides out there to get you started.

2) Sell what you don’t need! Whether it be on eBay, Craigslist or posting around your neighborhood selling furniture is a great way to create more cash for purchasing the pieces you really want. Make sure your price it well- higher than the lowest price you are willing to go but low enough to make it move. I recommend Craigslist as it helps to find buyers near you and allows for an easier process of pick up for your larger furniture items.

Both of these tips are one’s that we are using for our own house. Yesterday we dropped off two dressers to be refurbished that Jarret’s parents have had in their basement for a few years. They are both well made and with a little paint and some new hardware they will be the perfect pieces for one of our Guest Rooms. Instead of spending close to $1,000 for two dressers we will probably come out of this paying around $400 for two refurbished dressers that are painted in our ideal color and have the hardware we selected. For these dressers, we are going bold and selected a deep blue/ navy to go with the quilt and shams I bought this summer. We are working with Neatly Nested Decor in South Boston– Danielle (the owner) is amazing to work with (and her store is a must visit). These dressers will be the first of a few pieces I have her work on for the house.
Here is a little peak below…finished product to come in a few weeks! In the meantime, check out the inspiration for these dressers on my pinterest page and below

IMG_2859

dresserinspiration 2

dresserinspiration 3

dresserinspiration

Building, Design

House Update 2/23/2014- Walls are up!

I know I keep saying this every week, but it is really starting to feel like a house. This week they got all of the blue board up. Now they can start the plastering, trim and paint and right behind that is the cabinet installation. Jarret and I won’t be down till a week from Tuesday to check out the progress but that additional wait time will give us a lot more to see.
In heading to the house this weekend we prepared ourselves for the rooms to feel smaller than expected. Our contractor warned us that during the point of the blue board the rooms can feel smaller. Good news is, it didn’t feel small at all! Maybe it was just that we were so excited to see something other than the framing but we felt really good about the space in each room. Looking forward to seeing our paint selections come to life in the next week!

IMG_2881

Great Room
Great Room

Kitchen & Eating Area
Dining room
Dining room
Guest Bath
Guest Bath
Office
Office
Guest Bedroom
Guest Bedroom
Upstairs Hallway
Upstairs Hallway
Master Bedroom
Master Bedroom
Master Shower
Master Shower
Master bathroom
Master bathroom
Building, Design

House Update 2/17/2014

Countdown is on- we are at about 8-weeks till move in. Things continue to move fast. Right now the insulation is complete, inspection is complete and they started putting up the Blue Board today. We are on track to plaster this week- after plaster comes the garage doors, painting and then before you know it cabinet insulation!

Here are a few quick images from the house this weekend…with the 8-weeks out time to get shopping and start ordering our furniture!

IMG_2835

IMG_2834

IMG_2833

IMG_2832

IMG_2831

IMG_2830

Building, Design

House Update – 2/10/2014

Progress happens very quickly once the inside of the house starts getting the needed focus (and is ready for it). In less than 3-days most of the insulation is up and we should be ready for the 2nd to last inspection this week. After the insulation comes the blue board, plaster, walls and paint! Couldn’t be MORE excited to see the walls up as it will really start feeling like a home (and be a little warmer to walk thru). Here are some updates from this weekend- siding is nearly complete and now that it is almost done we couldn’t be happier with the color.

IMG_2816

IMG_2815

IMG_2814

IMG_2813

IMG_2812

IMG_2811

IMG_2810

IMG_2809

IMG_2808

IMG_2807

Building, Design, Shopping

Cabinet Hardware is ordered!

Finding out that IKEA sells well-made cabinet hardware was one of the best tips we got so far.  I just ordered all of our cabinet hardware for the house and the total was under $300 (plus I added in a cute cart to use in the nursery, and it was all available for purchase online).  We love the final selections and can’t wait to see it on the cabinets in a few weeks!

Kitchen Cabinet Hardware-

FÅGLAVIK- Handle, chrome plated, $7.99 / 2 pack

FÅGLEBODA handle
FÅGLEBODA handle

Master Bathroom Cabinet Hardware-

LINDSDAL- Handle, porcelain white- $6.99 / 2 pack

ikea5

Guest Bathroom Cabinet Hardware-

For the drawers

FÅGLEBODA- Handle, chrome plated- $7.99 / 2 pack

FÅGLEBODA Handle
FÅGLEBODA Handle


For doors

FÅGLEBODA knob
FÅGLEBODA knob


Cart for the nursery- this is perfect for odds and ends next to the dresser

ikea6
Building, Design, Shopping

Dining Room Chandelier

We purchased our last lighting fixture today- Hooray!  We couldn’t be more excited (and relieved).  Now that we have everything purchased it is fun to look back and day-dream about how each room will come together with the furniture we have been looking at and for the fixtures we have selected.

Pottery Barn has been one of the top destinations for our lighting fixtures.  There were several fixtures we were thinking about using in the Dining Room but in the end we agreed that the Mia Faceted-Crystal Pendant was the perfect choice.  It has a little glam and sophistication with the crystal but the antique bronze gives it a warmer feel.

We purchased the larger size as the room is a good size and we wanted it to have an impact over the table and when you walk in.  Looking at the pictures again it gets me excited for our first Holiday season in the house- looking forward to using a mix of old and new furniture and tableware in hosting our family and friends!

Mia Faceted-Crystal Pendant

Mia Faceted-Crystal Pendant

Mia Faceted-Crystal Pendant

Mia Faceted-Crystal Pendant